Cabin Rake...
Printed From: BMPT Forum
Category: Boats (In alphabetical order)
Forum Name: Seaplane Tenders
Forum Description: Discussion on Seaplane Tenders
URL: http://www.bmpt.co.uk/forum_posts.asp?TID=228
Printed Date: 26 March 2026 at 5:16pm
Topic: Cabin Rake...
Posted By: FlyByWire
Subject: Cabin Rake...
Date Posted: 29 October 2006 at 12:04pm
|
Hello,
I'm looking for aesthetic advice :) I'm restoring a 40ft SPT and I've been gathering plans over the last couple of years to help me. My restoration involves a complete rebuild of the superstructure and decks. Unbelievably, I think I've actually cut out all the rot and am now at the stage I never thought I'd really get to; rebuilding. The thing is, half the plans I have show the super-structure roof-line parallel to the water-line, whilst the other half have the roof-line parallel to the deck. Although it's very subtle, I believe SPT's float with their bows slightly higher than their sterns; as the only water mine sees is rain (on an annoying regular basis!), I'm only going by pictures and plans. That said, I've measured the distance between the cabin sole and the keel (or possibly the hog, as all my measurements were taken internally...for arguments sake, let's call it the depth of the bilge) at various points along the hull and this shows that the sole is lower at the bows than at the transom as compared to the line of the deck. So...my question, then; If I build my super-structure raked forward to follow the waterline, will it look right? Alternatively, if I build it to follow the line of the deck (which I think would be easier), will it end up looking weird when I put it back in the water? Any thoughts would be much appreciated, All the best, Paul |
Replies:
Posted By: dgray
Date Posted: 29 October 2006 at 6:48pm
|
Paul, Have you contacted BMPT as they may have plans. My restoration proceeds at a crawl. Superstructure finished, bilges painted and deck on. Loads to do yet. Have to try to fit a holding tank too. No mechanics in and I'm thinking of replacing the transom as it is ply and not in wonderful condition. It never stops. Glad you are moving forward. Where do you hope to berth her? Regards Don |
Posted By: FlyByWire
Date Posted: 30 October 2006 at 8:23am
|
Hi Don, I went to see the BMPT before they moved out of their shed at Husbands. I had a good look around ST1502, but didn't think to note whether they had built the superstructure parallel to the waterline or not... Have you got any pictures of your build? Have you build your superstructure parallel to the waterline or the deck? Out of interest, how had you attached your cabin-sides to the deck? What construction method have you used for your cabin-sides? ST1502 was built entirely out of ply, so far as I could see - I really fancy using more traditional techniques with mine... Mooring? Well, many years off though it may be, I have contacted my local harbour master (Truro and Falmouth) and attempted to get onto the waiting list for a mooring. The lists are currently between five and eight years long...which suits my restoration progress rather well :) I'm now on the preliminary waiting list for notification of the opening of the official waiting lists for the application of a mooring in Falmouth/Penryn :) How are you going to moor yours? ST's weren't intended to be left in the water all the time, but with props and rudders hanging off the bottom on P-brackets, beaching seems impractical. I'd wondered about building some sort of berthing-cradle on the Penryn River somewhere, but the harbour master was at little at odds with my enthusiasm... Is yours still just wood, or have you gone down the fibreglass sheathing route? Fibreglass sheathing seems a sensible option, but the cost and loss of authenticity is too much for me... All the best, Paul |
Posted By: dgray
Date Posted: 30 October 2006 at 10:22am
|
Hi Paul, I'm mooring mine at Lowestoft (dv). I'll probably have to sheath mine to the waterline as the dd planking isn't as good as I'd like. I'll get some photos of of our new cabin sides ( in hardwood ) and their fixings. Re the rake of the cabins, Zeta ( a Brooke Marine ST) follows the waterline 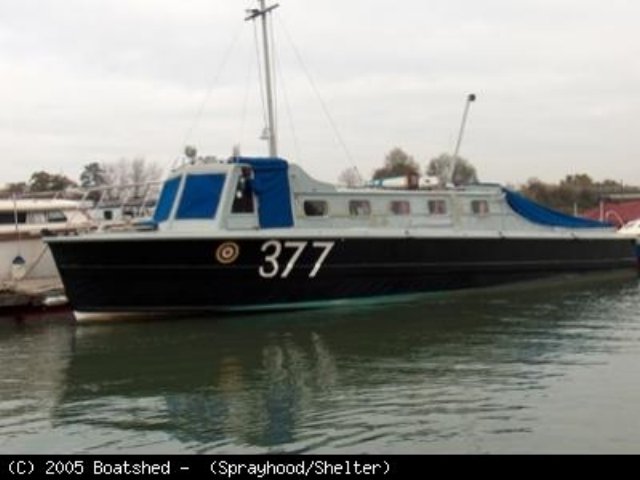 whereas a BPB & some others makers ST's follow the line of the deck (as mine does) 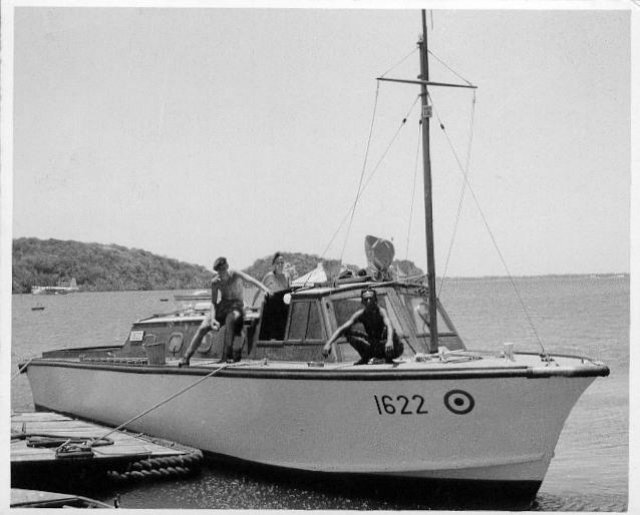 Hope the photos help. Regards ------------- Don Only a number, not even a name. How shall posterity hear of thy fame? |
Posted By: FlyByWire
Date Posted: 30 October 2006 at 10:33am
|
Thanks very much for that :) I've come across that picture of 1622 on the web before - it was when I first saw it that I thought "I've really got to restore my boat!" Pictures of your cabin sides and how they're fixed to the deck beams would be great - thanks for that. I may have mentioned it before, but my boat can be seen at http://www.seaplane-tender.co.uk - http://www.seaplane-tender.co.uk - I've not updated the site for a few weeks now, but I'll hopefully add some more to it next week...
Thanks again, Paul |
Posted By: AndyS
Date Posted: 30 October 2006 at 11:10pm
|
I am not sure what the Walton STs were arranged like, but it can be more complicated than you first think. Regarding the 41'6" ST Class shown in the phot above, if you look closely at the photo of ST1622 you will note that there is deck camber and also some reverse shear in the deck line. This was included to strengthen the fore dec and shed water. The cabin roof line (at centreline) on this ST model actually relates to the cabin sole level and is not related to keel, waterline or deck line , either at side or nominally at the vertual centreline. Sorry i can't be specific about your own boat but I am not familiar enough with that particular type to give specific comment. Good luck with the restoration. |
Posted By: FlyByWire
Date Posted: 31 October 2006 at 10:17am
|
Thanks for your thoughts, Andy... I think some of what you're seeing there (particularly the reverse sheer) may be a trick of the photo... I've actually built three models of my boat (well...two and a model of a Miami class ASR boat) using the same construction methods as the real thing and one thing I've discovered is that they're actually fairly quick and easy to build. Once you've got the frames in place, the rest of the boat pretty much builds itself - I would imagine this is a virtue in a boat being mass-produced during war-time... Reverse sheer and that sort of thing, I would have thought, would probably be avoided in favour of simplicity... I would imagine that the line of the cabin sole is dictated by that of the cabin roof rather than the other way round - you'd keep bashing your head on the ceiling at the wheelhouse end, otherwise :) I think I'm pretty much decided to follow the line of the deck - for anybody who's interested, I've added the plans I've drawn up to work from to my website at http://www.seaplane-tender.co.uk - http://www.seaplane-tender.co.uk ...they're not definitive or hugely detailed, but they give the general idea and let me take useful measurements. I've had to estimate the external line of the keel, as all measurements were taken internally... I tried modifying my plans to show a cabin following the water-line and, whilst it may look better in the water, it looks awkward on the plans... All the best, Paul |
Posted By: triker69uk
Date Posted: 10 November 2006 at 8:02pm
| re cabin rake, phone up RAF Hendon museum (research department) & ask them to send you a copy of 'RAF Marine Craft Class Directory Volume Three (Craft Of 41FT-27FT)', compiled byTerry Holtham (wss small craft group) museum ref is x002-8536. this contains a lot of details, pictures & plans of the 40ft spt mk1 (16f/58) |
Posted By: FlyByWire
Date Posted: 11 November 2006 at 2:00pm
|
Thanks for that - I'll get onto them first thing Monday :)
Many thanks, Paul |
Posted By: AndyS
Date Posted: 12 November 2006 at 11:49am
|
Paul Sorry for not being able to get back to you earlier, But I am working away. I agree with triker69uk and would advise to check photos and original drawings of as many boats of the same class and by the same builder as your boat as possible. Then use soem judgement. Most resorations have used wuite a bit of this in various areas and also been slightly modified for their intended use, but most people do not notice these changes. I would be careful about using 1622 as a basis for your boat. This is a BPBCo 41'6" ST design and I believe to have been UK build, but some of the 16xx Class were built to the same design in the far east, but have a few differences. Re:1622, reverse sheer IS included but not obvious on this photo as it is quite a small amount. It must occur to accommodate the deck camber as the gunwhales come in closer at the bow as otherwise the deckline would have foward shear as the sides came up to meet the centreline at the forwardmost point. ...and yes the original design of the BPBCo 41'6" ST has deck camber, but this has not always been carried over in modifications and re-builds. This does not significantly slow down the production assembly as significant use was used of jigs and sub assemblies to allow offline production at BPBCo Hythe and Poole and the double diagonal deck was spiled in edge to edge. I think that it was somewhere around a 4 week build period for an ST at BPBCo. From memory (as I am away from home and can not check) I believe that ST1622's cabin roof top line does follow the deck line, but follows the nominal line of where ithe centreline of deck would be if the deck beams actually passed right accross the cabin. Over the length of the deckhouse her deck beam varies from around 10' to 12' so the deck camber causes the height from the gunwhale to the bottom edge of the deckhouse side to varyapproximately in proportion Other contructors may have used different methods and details for thier STs, maybe even straight line shear or flat decks, but I am less familiar with them, so as mentioned above I can not directly comment on them. If I was back home then I would be able to give you some more costructive advise based on BPBCo construction. Good luck and best regards AndyS |
Posted By: triker69uk
Date Posted: 23 November 2006 at 1:09pm
|
Paul, any luck with that stuff from hendon. if not, can you (or someone) tell me how to upload the pictures on here for you graham |
Posted By: Pioneer
Date Posted: 23 November 2006 at 2:41pm
|
Hello Graham To 'upload' - First make sure that the pics are in jpeg format and get the picture to below 50kb. (You should be able to do this with your Picture Album software- send me a Private Message - and I will try and you help here) Once the picture is below 50kb - 'sign in' to the Forum and open the page that you want to place the picture in - Open Reply - 'click' on the end box in the top row of the 'Post Reply' panel (shows a tree with an upward pointing arrow) this will then open a 'Browse' notice - click into where the picture is on your computor (usually your own Picture Album) and select the picture- make sure that your title to the picture has only alphabetical letters - (no dashes or comma's etc). Follow the instructions - and your picture should appear in the Post Reply Box - as I said - drop me a PM and I'll try and explain it further if the above is not clear. Regards ------------- Pioneer - Forum Moderator |
Posted By: FlyByWire
Date Posted: 23 November 2006 at 3:59pm
|
Hiya, sorry about not replying sooner - I link to pictures either on my own website or to third party sites like http://www.imageshack.us - http://www.imageshack.us I would go with what Pioneer says, though, as that seems like a better way of doing it... I've not contacted Hendon yet, but I will today, with any luck (now you've reminded me!)
Thanks, Paul |
Posted By: dgray
Date Posted: 24 November 2006 at 11:25am
|
Hello Graham, Like Paul I normally put links to photos that I have uploaded to my web site. The forum size limit is understandably low and this means it's nearly impossible to upload a decent picture. The big advantage of 'linking' to an image on another site is that there is no file size limitation. Here's how I do it. Find the image you want in Internet Explorer. Right click on the picture and select 'Copy shortcut' Right click on the forum  button to display a dialog box. button to display a dialog box. Right click on the edit box (saying http://') & select the 'Paste' menu. The link to the image will be inserted in the edit box (http://www...). Click the OK button and you're finished. The picture will then appear in the message you are composing. These links are easy on the forum resources as the images are not stored on site. The only snag is that if they are deleted from your host site, they'll disappear from here too. Hope this helps... ------------- Don Only a number, not even a name. How shall posterity hear of thy fame? |